Thursday, March 13, 2014

AX2012 : Removal of suspension of recId allocation for table VendInvoiceInfoTable has failed.

Hi Friends,
Recently working on one environment on AX2012 FP CU4 I got the below error on posting purchase order invoice and the following steps helped to fix the error:
  1. Generate Full CIL
  2. Stop AOS
  3. Delete *.auc files
  4. Start AOS
Before running full CIL, I also tried with generating incremental IL, but that did not helped.


This might not be a sure shot solution but it worked for me.

Keep sharing!!!

Saturday, March 1, 2014

AX2012 R2 CU7 - Pallet transports -[Part III - Refill]

Hi Friends,
My previous two posts on pallet transports were about Setup and Inbound pallet transports, in this post let's have a look on refill pallet transports.
Refill's are required in warehouse to refill goods at picking locations. Normally the picking locations are refilled from buffer location.

Let's see setup required in system to generate automatic refill pallet transport:
1. Shipment reservation combination: Shipment reservation combination are defined on shipment template. This sequence is used to reserve goods for the shipment. Refill can be turned on only for item picking location sequence as shown below


2. Automatic creation and activation of refill transports can be defined in store areas.


Refills can also be created manually for a picking location from inventory locations form and then functions > Create refill as shown below, this option is only available for picking locations.


So let us walk through the first automatic scenario to create refill pallet transport using shipment reservation sequence.
First let's look at the setup and the current system situation. The current warehouse item setup for the item I will be using is as shown below


Note the item picking location is 01-01-01-1


The default issue location is 01-01-02-1 which is a bulk location


Now let us see the on hand of the item

Notice that all the goods are placed in the bulk location of my warehouse, see below all the locations where goods are currently stored are bulk locations


To keep it simple, I have defined the shipment reservation sequence to look only for item picking locations and have turned on the refill parameter as shown below:
So now we are all set to run the show, let's create a new sales order for this item

Notice the default location in SO line is coming from the warehouse items, let's take a look at inventory transaction at this point

Let's manually reserve the goods against the stock lying in bulk location, I am doing this to also show the reservation changes when we reserve the shipment

Let's move ahead and create an output order, this will create the shipment for the sales line, see below when the shipment is created it maintained the reservation done on sales line but the shipment status is still registered and it is not reserved


Now let's run the shipment reservation , the magic happens at this time, system will try to reserve the goods at the item picking location but as we know there is no on hand at item picking location and we have turned on the Refill parameter, so system will still reserve the goods at the item picking location and will also create a refill pallet transport from the bulk location to the item picking location, see below when we run the shipment reservation


Notice that the shipment status is registered but the reserved check box is turned on.
The reservation has changed to the item picking location and the status is Reserved ordered

At this point if you open the pallet transport screen you will see that system has created a refill pallet transport from the bulk location to picking location


Before proceeding further with the pallet transport,  let's activate the shipment and look at the picking list

Look at the picking route, it shows that goods needs to be picked from the item picking location

At this point if user tried to complete picking list he will get error because the refill is not yet  complete and the goods are still at the bulk location. So let's go to the refill pallet transport and complete it.


Look at the inventory transactions of the pallet transport


 Now let's look at the on hand of the item after completing the refill pallet transport, this shows that the goods have now been moved to the picking location:


Notice that on hand is now available at the picking location, so we are good now the picking location has been refilled form the buffer location and now we can complete the picking list created for the shipment


The shipment status changed to Picked

The inventory transaction is updated to picked from the item picking location

On the sales line the line quantity is shown as picked

The output order is shown as picked


So we walked through the scenario where system automatically created a refill pallet transport using shipment reservation sequence setup.

The other automatic scenario is the automatic creation of refill pallet transports from the store area setup.

When we pick item from a picking location (manually, from picking list or from any other pallet transport) then system automatically creates a refill pallet transport to the picking location if the remaining on hand qty falls below the setup defined in item warehouse location and if the store area of that location is having the automatic activation turned on and there is no other refill pallet transport already en-route to that picking location.

User can also create refills manually, directly from the location form, but this button is enabled only for the locations of type picking. The system uses same algorithm to check and create a refill pallet transport when it creates automatically or manually. Interested readers who want to read the code can check out the \Classes\WMSPickingLocationRefillCheck\checkAndRefill() function to understand more on the logic behind it.

So to summarize, refill pallet transports are created in the following situations:

  • Automatic -> Shipment reservations
  • Automatic -> Completing the picking route 
  • Automatic -> Completing pallet transport
  • Manually -> Refill function from locations form for picking locations.
Have a nice day and stay tuned...

Saturday, February 22, 2014

AX 2012 R2 CU7 - Pallet Transports -[Part II - Input]

Hi Friends,
This is the second post in continuation to my previous post here on pallet transport in Microsoft Dynamics AX. In the previous post we saw the setup required for using pallets in Microsoft Dynamics AX. In this post I will show how we can create input pallet transports to receive items in warehouse.
Inbound pallet transports are created during receiving of goods so that pallets can be put away inside the warehouse location from an Inbound location (dock/gate).

I created a new item in system and assigned storage dimension having pallets enabled

Define the warehouse item setup, note the default receipt location as this will be used later in the discussion:


And then define the pallet setup on the item, so we have defined that we store 10 qty of item on 1 pallet:

Now we are all set to create the purchase order for this item, so I created a purchase order for 50 qty as shown below:


Notice that the default location in the purchase order line "In_01" is coming from the warehouse setup defined for the item.
Next we go to item arrival overview form from Inventory and warehouse management > Periodic >> Arrival overview and select the purchase order which we need to start receiving, click on the start arrival checkbox and then start arrival button.


This will create an item arrival journal in the system
Go to item arrival overview from the menu button "Journal" > Show arrivals from line

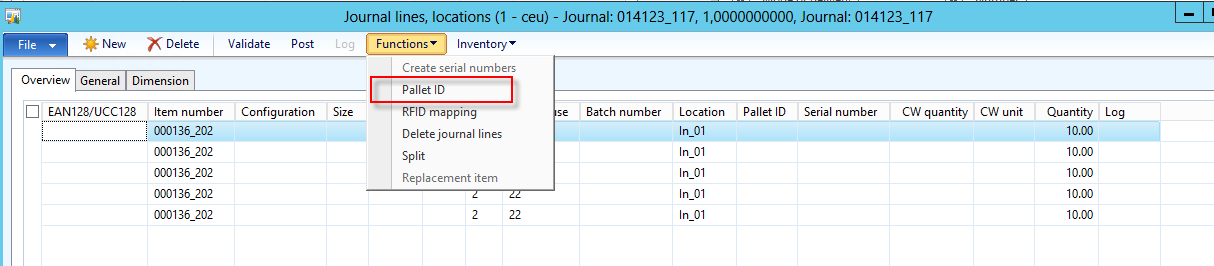
This will open the item arrival journal, you will notice that system has automatically created 5 lines as we are storing 10 qty on 1 pallet and we have started the arrival for 50 qty so we need 5 pallets to receive the goods:


Now we need to generate new pallet ID and assign it to each line, to do this go to functions --> pallets as shown below:


This will generate a pallet Id only for the selected line, you needs to repeat this for each line. Once you do this, you will see that each arrival journal line has a unique pallet ID.


Now go to general tab of each line and make sure the check box to create pallet transport is enabled and enable the locations where system needs to check for the put away location as shown below:


Once this is done, post the journal. During posting system will create 5 separate inbound pallet transports, one for each pallet and each transport has a unique Transport ID.
To view the pallet transports go to Inventory and warehouse management > common > pallet transports


I would like to add a pinch of technical flavour here, pallet transports are stored in WMSTransport table which has a unique index on Transport ID.


Pallet transport lines are stored in WMSOrderTrans table and this table is related with WmsTransport table, the RouteID in WMSOrderTrans is the TransportID in the WMSTransportTable


 During the posting of the arrival journal system check the condition to create a pallet transport in the class WMSJournalCheckPostReceiption\postTrans method.


If you look at the Inventory transactions at this point the goods are shown at the destination location in status arrived, this is to allow issues to reserve order the goods, see the highlighted green explanation above:


Note the pickup locations for all the pallet transports are same as they arrived at inbound dock 01 and destination location is different which is based on put away logic used by system to determine the destination location during the posting process.

To start the pallet transport select it and click on start transport , this will open a pop up a dialog  where we can enter the forklift and the driver to whom this is assigned:


Once the transport is started the "Complete transport" button gets enabled and the transport can be complete by clicking it, we can select multiple started pallet transports and complete them.


Now I complete all the pallet transports. Now if we look at On hand of the item, notice that items are now physically available in the warehouse:


Let's look at the inventory transactions at this point, notice that goods have been registered


Now we can move ahead with the purchase order postings and post the receipt list, product receipt and Invoice of the purchase order. When we post product receipt, inventory transactions will have status as Received and once we post invoice, done the goods shown as purchased in the inventory transactions:


So we saw in this post how we can create inbound pallet transports to receiving the goods in a warehouse in Microsoft Dynamics AX2012 R2.

Stay tuned...more to come.

Saturday, February 15, 2014

AX2012 R2 CU7 - Pallet Transports [Part I - Setup]

Hi Friends,
I am starting a  blog post series on Pallet Transports in AX and will be covering it in around five posts.
In this first post I'll try to explain basics of pallet transports and setup required in AX, followed by blogs on how to setup the system for creating inbound, refill, outbound and relocation pallet transports.
I will be using AX2012 R2 CU7 during the process. The information is based on my understanding and in case you want to correct me please push your comments, they are welcome.
PS: Warehousing scenarios can vary from simple to very complex, and I will be using very simple scenarios as the main goal is to make sure we understand the way pallet transports work in AX and not how to handle the real time complex scenarios.
So let's start with some basic terms:
Pallet: A device to store, transport materials smoothly inside a warehouse. It can be of different sizes, specifications according to international shipping standards. To get a basic understanding see below an image of a simple pallet, pictures speak louder than words:


Pallet transport : It is moving a pallet from one warehouse location to another warehouse location.
Mostly pallets are transported by using forklift machines. A typical forklift machine carrying a pallet looks as shown below:
Pallet transports in AX are classified based on the location type between which they are moved:
1. Input pallet transports: Moving pallet from an Inbound dock to a buffer/picking location.
2. Refill pallet transports: Moving pallet from a buffer location to picking location.
3. Outbound pallet transport: Moving pallet from a buffer location to an outbound dock
4. Relocation pallet transport: Moving pallet from one location to another location for example from one bulk location to another bulk location.

I try to depict the various types of pallet transports in below diagram:


Now let me share some setup required in AX to use Pallets and pallet transports:

The first setup is to enable configuration key of pallets in warehouse management II, if pallets are not enabled here then you will not be able to see any pallet functionality in the system. To do this you can go to System Administration >>Setup>> License>> License configuration


Next you need to configure the item which you want to store on a pallet. As the meaning of pallet is clear now, we agree that it should be a storage dimension as it defines they way we store an item. So the storage dimension group used on the item should have "Pallets" enabled on it as shown below:


Then you need to  setup pallet types and pallet groups from Inventory and warehouse management >> Setup>>Inventory equipment [Remember if the configuration key of pallets is turned off then you will not be able to see these menu items]


Now you need to define how much qty of your item can be stored on 1 pallet and what pallet type is used to store it, you can define these fields on released product>> Manage Inventory fast tab>>Handling group as shown below


Make sure warehouse is configured with locations and item warehouse setup is defined on the item.
Once this is defined you are all set to use your item on pallets and we are all set to start exploring the pallet transports in my next blog post.