Hi Friends,
This is the second post in continuation to my previous post here on pallet transport in Microsoft Dynamics AX. In the previous post we saw the setup required for using pallets in Microsoft Dynamics AX. In this post I will show how we can create input pallet transports to receive items in warehouse.
Inbound pallet transports are created during receiving of goods so that pallets can be put away inside the warehouse location from an Inbound location (dock/gate).
I created a new item in system and assigned storage dimension having pallets enabled

Define the warehouse item setup, note the default receipt location as this will be used later in the discussion:

And then define the pallet setup on the item, so we have defined that we store 10 qty of item on 1 pallet:

Now we are all set to create the purchase order for this item, so I created a purchase order for 50 qty as shown below:

Notice that the default location in the purchase order line "In_01" is coming from the warehouse setup defined for the item.
Next we go to item arrival overview form from Inventory and warehouse management > Periodic >> Arrival overview and select the purchase order which we need to start receiving, click on the start arrival checkbox and then start arrival button.

This will create an item arrival journal in the system
 Go to item arrival overview from the menu button "Journal" > Show arrivals from line
 This will open the item arrival journal, you will notice that system has automatically created 5 lines as we are storing 10 qty on 1 pallet and we have started the arrival for 50 qty so we need 5 pallets to receive the goods:

Now we need to generate new pallet ID and assign it to each line, to do this go to functions --> pallets as shown below:
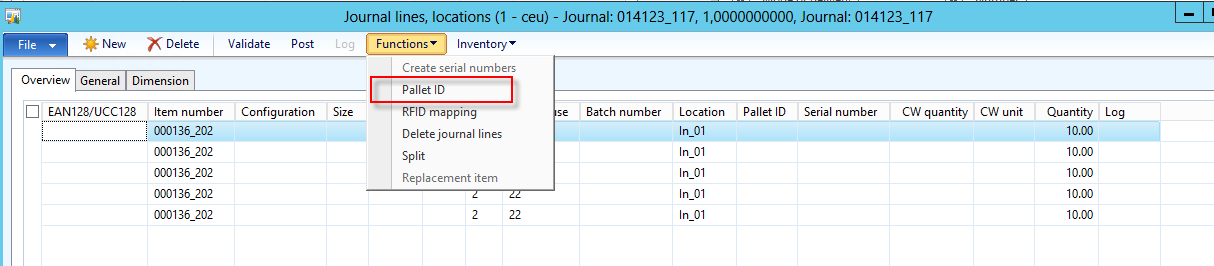
This will generate a pallet Id only for the selected line, you needs to repeat this for each line. Once you do this, you will see that each arrival journal line has a unique pallet ID.

Now go to general tab of each line and make sure the check box to create pallet transport is enabled and enable the locations where system needs to check for the put away location as shown below:

Once this is done, post the journal. During posting system will create 5 separate inbound pallet transports, one for each pallet and each transport has a unique Transport ID.
To view the pallet transports go to Inventory and warehouse management > common > pallet transports

I would like to add a pinch of technical flavour here, pallet transports are stored in WMSTransport table which has a unique index on Transport ID.


Note the pickup locations for all the pallet transports are same as they arrived at inbound dock 01 and destination location is different which is based on put away logic used by system to determine the destination location during the posting process.
To start the pallet transport select it and click on start transport , this will open a pop up a dialog where we can enter the forklift and the driver to whom this is assigned:

Once the transport is started the "Complete transport" button gets enabled and the transport can be complete by clicking it, we can select multiple started pallet transports and complete them.

Now I complete all the pallet transports. Now if we look at On hand of the item, notice that items are now physically available in the warehouse:

Let's look at the inventory transactions at this point, notice that goods have been registered

Now we can move ahead with the purchase order postings and post the receipt list, product receipt and Invoice of the purchase order. When we post product receipt, inventory transactions will have status as Received and once we post invoice, done the goods shown as purchased in the inventory transactions:

So we saw in this post how we can create inbound pallet transports to receiving the goods in a warehouse in Microsoft Dynamics AX2012 R2.
Stay tuned...more to come.
This is the second post in continuation to my previous post here on pallet transport in Microsoft Dynamics AX. In the previous post we saw the setup required for using pallets in Microsoft Dynamics AX. In this post I will show how we can create input pallet transports to receive items in warehouse.
Inbound pallet transports are created during receiving of goods so that pallets can be put away inside the warehouse location from an Inbound location (dock/gate).
I created a new item in system and assigned storage dimension having pallets enabled
Define the warehouse item setup, note the default receipt location as this will be used later in the discussion:
And then define the pallet setup on the item, so we have defined that we store 10 qty of item on 1 pallet:
Now we are all set to create the purchase order for this item, so I created a purchase order for 50 qty as shown below:
Notice that the default location in the purchase order line "In_01" is coming from the warehouse setup defined for the item.
Next we go to item arrival overview form from Inventory and warehouse management > Periodic >> Arrival overview and select the purchase order which we need to start receiving, click on the start arrival checkbox and then start arrival button.
This will create an item arrival journal in the system
This will generate a pallet Id only for the selected line, you needs to repeat this for each line. Once you do this, you will see that each arrival journal line has a unique pallet ID.
Now go to general tab of each line and make sure the check box to create pallet transport is enabled and enable the locations where system needs to check for the put away location as shown below:
Once this is done, post the journal. During posting system will create 5 separate inbound pallet transports, one for each pallet and each transport has a unique Transport ID.
To view the pallet transports go to Inventory and warehouse management > common > pallet transports
I would like to add a pinch of technical flavour here, pallet transports are stored in WMSTransport table which has a unique index on Transport ID.
Pallet transport lines are stored in WMSOrderTrans table and this table is related with WmsTransport table, the RouteID in WMSOrderTrans is the TransportID in the WMSTransportTable
During the posting of the arrival journal system check the condition to create a pallet transport in the class WMSJournalCheckPostReceiption\postTrans method.
If you look at the Inventory transactions at this point the goods are shown at the destination location in status arrived, this is to allow issues to reserve order the goods, see the highlighted green explanation above:
Note the pickup locations for all the pallet transports are same as they arrived at inbound dock 01 and destination location is different which is based on put away logic used by system to determine the destination location during the posting process.
To start the pallet transport select it and click on start transport , this will open a pop up a dialog where we can enter the forklift and the driver to whom this is assigned:
Now I complete all the pallet transports. Now if we look at On hand of the item, notice that items are now physically available in the warehouse:
Now we can move ahead with the purchase order postings and post the receipt list, product receipt and Invoice of the purchase order. When we post product receipt, inventory transactions will have status as Received and once we post invoice, done the goods shown as purchased in the inventory transactions:
So we saw in this post how we can create inbound pallet transports to receiving the goods in a warehouse in Microsoft Dynamics AX2012 R2.
Stay tuned...more to come.